12/07/2009

Difference between UTP and STP Cables

Network Cable Types

Overview:

A network is defined as two or more computers linked together for the purpose of communicating and sharing information and other resources. Most networks are constructed around a cable connection that links the computers. This connection permits the computers to talk (and listen) through a wire.

Types of Networking Cables:

The three main types of networking cables are coaxial cable, twisted-pair cable and fiber optic cable.
Coaxial Cable:
Coaxial cable is made of two conductors that share the same axis; the center is a copper wire that is insulated by a plastic coating and then wrapped with an outer conductor (usually a wire braid). This outer conductor around the insulation serves as electrical shielding for the signal being carried by the inner conductor. A tough insulating plastic tube outside the outer conductor provides physical and electrical protection. At one time, coaxial cable was the most widely used network cabling. However, with improvements and the lower cost of twisted-pair cables, it has lost its popularity.
There are two types of coaxial cable.
  1. ThickNet
  2. ThinNet
ThickNet:
Thick Net is about .38 inches in diameter. This makes it a better conductor, and it can carry a signal about 1640 feet (500 meters) before signal strength begins to suffer. The disadvantage of ThickNet over ThinNet is that it is more difficult to work with. The ThickNet version is also known as standard Ethernet cable.
Thin Net:
Thin Net is the easiest to use. It is about .25 inches in diameter, making it flexible and easy to work with (it is similar to the material commonly used for cable TV). ThinNet can carry a signal about 605 feet (185 meters) before signal strength begins to suffer.
Name Description Type Segment Speed
10Base2 ThinNet Coaxial 185 meters 10 Mbps
10Base5 ThickNet Coaxial 500 meters 10 Mbps


Coaxial cable can only be used with a BNC (bayonet-Neill-Concelman) connector. The following image will show you a BNC connector.


Twisted-Pair Cable:

Twisted-pair cable consists of two insulated strands of copper wire twisted around each other to form a pair. One or more twisted pairs are used in a twisted-pair cable. The purpose of twisting the wires is to eliminate electrical interference from other wires and outside sources such as motors. Twisting the wires cancels any electrical noise from the adjacent pair. The more twists per linear foot, the greater the effect.
There are two types of twisted pair cable.
  1. Shielded Twisted Pair (STP)
  2. Unshielded Twisted Pair (UTP)
Shielded Twisted Pair (STP):
The only difference between STP and UTP is that STP has a foil or wire braid wrapped around the individual wires of the pairs. The shielding is designed to minimize EMI radiation and susceptibility to crosstalk. The STP cable uses a woven-copper braided jacket, which is a higher-quality, more protective jacket than UTP.
Unshielded Twisted Pair (UTP):
As the name implies, "unshielded twisted pair" (UTP) cabling is twisted pair cabling that contains no shielding. UTP cables can be divided further into following categories:
Category1 Traditional telephone cable. Carries voice but not data
Category2 Certified UTP for data transmission of up to 4 megabits per second (Mbps). It has four twisted pairs
Category3 Certified UTP for data transmission of up to 10 Mbps. It has four twisted pairs
Category4 Certified UTP for data transmission of up to 16 Mbps. It has four twisted pairs
Category5 Certified for data transmission of up to 100 Mbps. It has four twisted pairs of copper wire
Category6 Offers transmission speeds up to 155 Mbps
Category7 Category 7 is a proposed standard that aims to support transmission at frequencies up to 600 MHz
Twisted-pair cable has several advantages over other types of cable (coaxial and fiberoptic): It is readily available, easy to install, and inexpensive. Among its disadvantages are its sensitivity to electromagnetic interference (EMI), its susceptibility to eavesdropping, its lack of support for communication at distances of greater than 100 feet, and its requirement of a hub (multiple network connection point) if it is to be used with more than two computers. Twisted pair cables use RJ45 connector.

NETWORK CABLE TYPES

Name Description Type Segment Speed
10BaseT Common; being phased out for 100BaseT UTP .5 to 100 meters 10 Mbps
100BaseT Common Twisted-pair .5 to 100 meters 100 Mbps

Fiberoptic Cable:

Fiberoptic cable is made of light-conducting glass or plastic fibers. It can carry data signals in the form of modulated pulses of light. The plastic-core cables are easier to install but do not carry signals as far as glass-core cables. Multiple fiber cores can be bundled in the center of the protective tubing.


When both material and installation costs are taken into account, fiberoptic cable can prove to be no more expensive than twisted-pair or coaxial cable. Fiber has some advantages over copper wire: It is immune to EMI and detection outside the cable and provides a reliable and secure transmission media. It also supports very high bandwidths (the amount of information the cable can carry), so it can handle thousands of times more data than twisted-pair or coaxial cable.Cable lengths can run from .25 to 2.0 kilometers depending on the fiberoptic cable and network. If you need to network multiple buildings, this should be the cable of choice. Fiberoptic cable systems require the use of fiber-compatible NICs.


Network Topologies BUS,STAR,RING,HYBRID & MESH


NETWORK TOPOLOGY


Topology : It is a physical arrangement of the computer systems in a network or physical establishment of networks.

TYPES OF TOPOLOGY

  1. BUS TOPOLOGY: Past.
  1. STAR TOPOLOGY: Presently.
  1. RING TOPOLOGY: Used For IBM.
  1. HYBRID TOPOLOGY: It Is The Combination Of Any Two Topologies.
  1. MESH TOPOLOGY: It Is The Combination Of All Types Of Topology.


BUS TOPOLOGY

1. BUS TOPOLOGY CABLES: -

      In this topology we are using co – axial cable.

Ex: - star television cable.

Co – axial cables are of 2 types : -

Thin co–axial cable: - 0.25 inches thin, data transfer rate is (10 MBPS / 200 MBPS ).
Thick co–axial cable: - 0.50 inches thick, data transfer rate is (10 MBPS / 500 MBPS ).

CONNECTION IN BUS TOPOLOGY : -

NIC connector with BNC NIC: Network Interface Card. BNC: British Navigator Connector.


 Architecture Of The Bus Topology : -

4 DIS – advantages of bus topology : -

  1. Too much collusion is available due to traffic jam.
  1. No security and permissions are available.
  1. If in the network one computer is not working all computers will be collapsed.

Star Topology

Now a days in so many places we are using star topology


1. Star topology connectors : -

  1. NIC card with rj-45 (removed jack) connector.
  1. Rj-45 clip.
  1. Central interface device: - ex: repeaters, hub and switches.
2. Star topology cables : -

  1. UTP cable: It is a un-shielded twisted pair cable , which have 8 – wire
(4-pairs) cable
  1. Data transfer speed is 100 mbps / 256 mbps.
  1. The cable is twisted, to stop the cross linking and to flow the data in a straight line.

Twisted pair cables have some category:


Cat 1
cat 2
These are Tele-Phone wires, having two wires.
Cat 3
( 4 mbps)
cat 4
( 16 Mbps)
These are used in ring topology, these are called as S.T.P wires having 4 wires
Cat 5
( 100 Mbps )
cat 6
( 256 Mbps )
These are used in star topology, these are called as U.T.P wires having 8 wires.


RING TOPOLOGY


  1. Used in IBM computers.
  2. Uses S.T.P cables.
  3. S.T.P cables have 4 wires {2 pairs}.
  4. It is multi station access unit.
  5. Based on token policy, token – 6 bit data address.
  6. Data transmission speed is 4 mbps/16 mbps.

Hybrid topology

A network topology that uses two or more network Topolgy
The Physical Hybrid Topology


With the hybrid Topology, two or more topologies are combined to form a complete network. For example, a hybrid Topology could be the combination of a star and bus topology. These are also the most common in use.
Star-Bus

In a star-bus topology, several star topology networks are linked to a bus connection. In this topology, if a computer fails, it will not affect the rest of the network. However, if the central component, or hub, that attaches all computers in a star, fails, then you have big problems since no computer will be able to communicate.
Start-Ring

In the Star-Ring topology, the computers are connected to a central component as in a star network. These components, however, are wired to form a ring network.
Like the star-bus topology, if a single computer fails, it will not affect the rest of the network. By using token passing, each computer in a star-ring topology has an equal chance of communicating. This allows for greater network traffic between segments than in a star-bus topology.

The Physical Mesh Topology


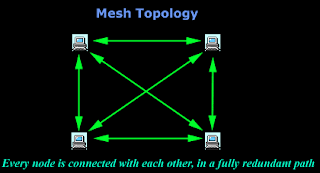
In a Mesh Topology each computer is connected to every other computer by a separate cable. This configuration provides redundant paths through the new work, so if one computer blows up, you don't lose the network :) On a large scale, you can connect multiple LANs using mesh topology with leased telephone lines, Thicknet coaxial cable or fiber optic cable.
Again, the big advantage of this topology is its backup capabilities by providing multiple paths through the network.

12/06/2009

Windows run commands ,Run shortcuts 200

Windows Run Command List
  1. Accessibility Controls – access.cpl
  2. Accessibility Wizard – accwiz
  3. Add Hardware – Wizardhdwwiz.cpl
  4. Add/Remove Programs – appwiz.cpl
  5. Administrative Tools control – admintools
  6. Adobe Acrobat (if installed) – acrobat
  7. Adobe Designer (if installed)- acrodist
  8. Adobe Distiller (if installed)- acrodist
  9. Adobe ImageReady (if installed)- imageready
  10. Adobe Photoshop (if installed)- photoshop
  11. Automatic Updates – wuaucpl.cpl
  12. Bluetooth Transfer Wizard -fsquirt
  13. Calculator – calc
  14. Certificate Manager –certmgr.msc
  15. Character Map – charmap
  16. Check Disk Utility – chkdsk
  17. Clipboard Viewer – clipbrd
  18. Command Prompt – cmd
  19. Component Services – dcomcnfg
  20. Computer Management – compmgmt.msc
  21. Control Panel – control
  22. Date and Time Properties – timedate.cpl
  23. DDE Shares – ddeshare
  24. Device Manager – devmgmt.msc
  25. Direct X Control Panel (If Installed)- directx.cpl
  26. Direct X Troubleshooter- dxdiag
  27. Disk Cleanup Utility- cleanmgr
  28. Disk Defragment- dfrg.msc
  29. Disk Management- diskmgmt.msc
  30. Disk Partition Manager- diskpart
  31. Display Properties (w/Appearance Tab Preselected)- control color
  32. Display Properties- control desktop
  33. Display Properties- desk.cpl
  34. Dr. Watson System Troubleshooting Utility- drwtsn32
  35. Driver Verifier Utility- verifier
  36. Event Viewer- eventvwr.msc
  37. File Signature Verification Tool- sigverif
  38. Files and Settings Transfer Tool- migwiz
  39. Findfast- findfast.cpl
  40. Firefox (if installed)- firefox
  41. Folders Properties- control folders
  42. Fonts- control fonts
  43. Fonts Folder- fonts
  44. Free Cell Card Game- freecell
  45. Game Controllers- joy.cpl
  46. Group Policy Editor (XP Prof)- gpedit.msc
  47. Hearts Card Game- mshearts
  48. Help and Support- helpctr
  49. HyperTerminal- hypertrm
  50. Iexpress Wizard- iexpress
  51. Indexing Service- ciadv.msc
  52. Internet Connection Wizard- icwconn1
  53. Internet Explorer- iexplore
  54. Internet Properties- inetcpl.cpl
  55. Internet Setup Wizard- inetwiz
  56. IP Configuration (Delete DNS Cache Contents)- ipconfig /flushdns
  57. IP Configuration (Display Connection Configuration) – ipconfi/all
  58. IP Configuration (Display DHCP Class ID)- ipconfig/showclassid
  59. IP Configuration (Display DNS Cache Contents)- ipconfig /displaydns
  60. IP Configuration (Modifies DHCP Class ID)- ipconfig /setclassid
  61. IP Configuration (Release All Connections)- ipconfig /release
  62. IP Configuration (Renew All Connections)- ipconfig /renew
  63. IP Configuration(RefreshesDHCP&Re-RegistersDNS)-ipconfig/registerdns
  64. Java Control Panel (If Installed)- javaws
  65. Java Control Panel (If Installed)- jpicpl32.cpl
  66. Keyboard Properties – control keyboard
  67. Local Security Settings – secpol.msc
  68. Local Users and Groups – lusrmgr.msc
  69. Logs You Out Of Windows – logoff…..
  70. Malicious Software Removal Tool – mrt
  71. Microsoft Access (if installed) – access.cpl
  72. Microsoft Chat – winchat
  73. Microsoft Excel (if installed) – excel
  74. Microsoft Frontpage (if installed)- frontpg
  75. Microsoft Movie Maker – moviemk
  76. Microsoft Paint – mspaint
  77. Microsoft Powerpoint (if installed)- powerpnt
  78. Microsoft Syncronization Tool – mobsync
  79. Microsoft Word (if installed)- winword
  80. Minesweeper Game – winmine
  81. Mouse Properties – control mouse
  82. Mouse Properties – main.cpl
  83. Nero (if installed)- nero
  84. Netmeeting – conf
  85. Network Connections – control netconnections
  86. Network Connections – ncpa.cpl
  87. Network Setup Wizard – netsetup.cpl
  88. Notepad – notepad
  89. Nview Desktop Manager (If Installed)- nvtuicpl.cpl
  90. Object Packager – packager
  91. ODBC Data Source Administrator- odbccp32.cpl
  92. On Screen Keyboard – osk
  93. Opens AC3 Filter (If Installed) – ac3filter.cpl
  94. Outlook Express – msimn
  95. Paint – pbrush
  96. Password Properties – password.cpl
  97. Performance Monitor – perfmon.msc
  98. Phone and Modem Options – telephon.cpl
  99. Phone Dialer – dialer
  100. Pinball Game – pinball
  101. Power Configuration – powercfg.cpl
  102. Printers and Faxes – control printers
  103. Printers Folder – printers
  104. Private Character Editor – eudcedit
  105. Quicktime (If Installed)- QuickTime.cpl
  106. Real Player (if installed)- realplay
  107. Regional Settings – intl.cpl
  108. Registry Editor – regedit
  109. Registry Editor – regedit32
  110. Remote Access Phonebook – rasphone
  111. Remote Desktop – mstsc
  112. Removable Storage – ntmsmgr.msc
  113. Removable Storage Operator Requests – ntmsoprq.msc
  114. Resultant Set of Policy (XP Prof) – rsop.msc
  115. Scanners and Cameras – sticpl.cpl
  116. Scheduled Tasks – control schedtasks
  117. Security Center – wscui.cpl
  118. Services – services.msc
  119. Shared Folders – fsmgmt.msc
  120. Shuts Down Windows – shutdown
  121. Sounds and Audio – mmsys.cpl
  122. Spider Solitare Card Game – spider
  123. SQL Client Configuration – cliconfg
  124. System Configuration Editor – sysedit
  125. System Configuration Utility – msconfig
  126. System File Checker Utility (Purge File Cache)- sfc /purgecache
  127. System File Checker Utility (Return to Default Setting)- sfc /revert
  128. System File Checker Utility (Scan Immediately)- sfc /scannow
  129. System File Checker Utility (Scan On Every Boot) – sfc /scanboot
  130. System File Checker Utility (Scan Once At Next Boot)- sfc /scanonce
  131. System File Checker Utility (Set Cache Size to size x)-sfc/cachesize=x
  132. System Information – msinfo32.
  133. System Properties – sysdm.cpl
  134. Task Manager – taskmgr
  135. Task Manager – taskmgr
  136. TCP Tester – tcptest
  137. Telnet Client – telnet
  138. Tweak UI (if installed) – tweakui
  139. User Account Management- nusrmgr.cpl
  140. Utility Manager – utilman
  141. Windows Address Book – wab
  142. Windows Address Book Import Utility – wabmig
  143. Windows Backup Utility (if installed)- ntbackup
  144. Windows Explorer – explorer
  145. Windows Firewall- firewall.cpl
  146. Windows Magnifier- magnify
  147. Windows Management Infrastructure – wmimgmt.msc
  148. Windows Media Player – wmplayer
  149. Windows Messenger – msmsgs
  150. Windows Picture Import Wizard (need camera connected)- wiaacmgr
  151. Windows System Security Tool – syskey
  152. Windows Update Launches – wupdmgr
  153. Windows Version (to show which version of windows)- winver
  154. Windows XP Tour Wizard – tourstart
  155. Wordpad – write

8/25/2009

How To Disable USB Removable Mass Storage Device Drive Access in Windows

It’s possible to simply disable USB ports support in PC BIOS in order to prevent and forbid computer user from using USB removable flash drive or mass storage device (portable hard disk drive) to copy and transfer data and files. However, disabling USB ports totally also shutdown the ability for system to use USB based keyboard, mouse, webcam, printer, scanner and etc, which has become a common connectivity norm in modern computer.As a workaround, use the following registry hack to stop USB Mass Storage Device drivers from starting when the system boots up.
Run Registry Editor (regedit).
Navigate to the following registry key:
HKEY_LOCAL_MACHINE\SYSTEM\CurrentControlSet\Services\UsbStorIn the right pane, double click on the Start value name.
Change the value data to 4 to disable the removable USB mass storage device drive access.

To revert and re-enable the drive access for removable USB mass storage device driver, change back the value data for Start to its original default of 3.
The change will take effect immediately to block any USB mass storage device such as USB flash drive, USB key and portable harddisk from been used in the system, while still allowing hardware components to work properly via USB connection. The hack works in most Windows operating system such as Windows Vista, XP, Windows Server 2008, 2003 and 2000.

7/29/2009

MODEM INSTALLATION IN LINUX

Red hat-config-network
  1. Click new
  2. Select modem connection
  3. Forward
  4. Probing for modem
  5. Select modem (manually)
  6. Dev/modem
  7. Click forward
  8. Select provider
  9. Prefix area code phone number
  10. 91 040 112233
  11. Provider name: - BSNL
  12. Login name Password
  13. Click forward
  14. Select automatically obtain IP address setting.
  15. Click forward
  16. Click apply
  17. Select modem
  18. Click activate
  19. Click YES
  20. Click OK
  21. After the modem Installation we want access Internet.
  22. Right click desktop.
  23. Open terminal.
  24. Kppp
  25. Connect to popup open.
  26. Select login name and password.
  27. Click connect

PRINTER INSTALLATION IN LINUX

Printer installation in graphical mode
Main menu
System settings
Printing
Red hat-config-printer
Click new
Add a new print queue
Click forward
Queue name
Click forward

Select a queue type.

1. Locally connected.
2. Network cups (IPP)
3. Networked UNIX (LPD)
4. Networked windows (SMB)
5. Networked novel (NCP)
6. Networked jet direct.
Select locally connected
Select /dev/lpo
Click forward
Select printer manufacture and model.
Click forward (hp lacer 6l)
Click apply

Printer Installation in Text Mode
#Red hat-config-printer
Click new
Type Queue name and select Queue type.(Local printer device)
Click next
Select device path/dev/lpo
Click next
Select printer manufacture and model name
Click next
Click finish

NETWORK CONFIGURATION IN LINUX


Redhat-config-network

Start
Main menu
System settings
Network
Click new
Select LAN Ethernet connection
Click forward
Select statically set IP address
Type 192.168.100.5
Subnet mask
Type 255.255.255.0
Click forward
Click apply
Click active option
Select YES
Click OK
To check LAN card address
#IF config

LINUX FILE AND DIRECTORY PERMISSIONS

There are two types of permission modes
They are 

1.Symbolic mode.
2. Absolute mode.

Symbolic mode: - Read =R User =U
Write =W Groups =G
Execute =X Other =O

#Chmod G+W file name
#Chmod G-W file name
 (“-RW-R—R--)

[-Indicates file, RW-indicates users, R—indicates groups, R— others.
Screen graphical mode “CRLT+ALT+F7”

Absolute mode: -

Read =4
Write =2
Execute =1

#Chmod 7 7 7filename

User group other
4+2+1 4+2+1 4+2+1

Linux files are setup so access to them is controlled. There are three types of access:
  1. read
  2. write
  3. execute
Each file belongs to a specific user and group. Access to the files is controlled by user, group, and what is called other. The term, other, is used to refer to someone who is not the user (owner) of the file, nor is the person a member of the group the file belongs to. When talking about setting permissions for "other" users to use, it is commonly referred to as setting the world execute, read, or write bit since anyone in the world will be able to perform the operation if the permission is set in the other category.

File names and permission characters

File names can be up to 256 characters long with "-", "_", and "." characters along with letters and numbers.
When a long file listing is done, there are 10 characters that are shown on the left that indicate type and permissions of the file. File permissions are shown according to the following syntax example: drwerwerwe
There are a total of 10 characters in this example, as in all Linux files. The first character indicates the type of file, and the next three indicate read, write, and execute permission for each of the three user types, user, group and other. Since there are three types of permission for three users, there are a total of nine permission bits. The table below shows the syntax:

12345678910
FileUser PermissionsGroup PermissionsOther Permissions
TypeReadWriteExecuteReadWriteExecuteReadWriteExecute
drwerwerwe


  • Character 1 is the type of file: - is ordinary, d is directory, l is link.
  • Characters 2-4 show owner permissions. Character 2 indicates read permission, character 3 indicates write permission, and character 4 indicates execute permission.
  • Characters 5-7 show group permissions. Character 5=read, 6=write, 7=execute
  • Characters 8-10 show permissions for all other users. Character 8=read, 9=write, 10=execute
There are 5 possible characters in the permission fields. They are:
  • r = read - This is only found in the read field.
  • w = write - This is only found in the write field.
  • x = execute - This is only found in the execute field.
  • s = setuid - This is only found in the execute field.
  • If there is a "-" in a particular location, there is no permission. This may be found in any field whether read, write, or execute field.

Examples

Type "ls -l" and a listing like the following is displayed:
total 10


drwxrwxrwx4georgeteam1122Dec 12 18:02Projects
-rw-rw-rw-1george team11873Aug 23 08:34test
-rw-rw-rw-1georgeteam11234Sep 12 11:13 datafile
Which means the following:
Type and# ofFiles'sFile'sSize in Date of lastFilename
Permission fieldLinksOwnerGroupBytesmodification
drwxrwxrwx 4georgeteam1122Dec 12 18:02Projects
The fields are as follows:
  1. Type field: The first character in the field indicates a file type of one of the following:
    • d = directory
    • l = symbolic link
    • s = socket
    • p = named pipe
    • - = regular file
    • c= character (unbuffered) device file special
    • b=block (buffered) device file special
  2. Permissions are explained above.
  3. Links: The number of directory entries that refer to the file. In our example, there are four.
  4. The file's owner in our example is George.
  5. The group the file belongs to. In our example, the group is team1.
  6. The size of the file in bytes
  7. The last modification date. If the file is recent, the date and time is shown. If the file is not in the current year, the year is shown rather than time.
  8. The name of the file.

Set User Identification Attribute

The file permissions bits include an execute permission bit for file owner, group and other. When the execute bit for the owner is set to "s" the set user ID bit is set. This causes any persons or processes that run the file to have access to system resources as though they are the owner of the file. When the execute bit for the group is set to "s", the set group ID bit is set and the user running the program is given access based on access permission for the group the file belongs to. The following command:

chmod +s myfile

sets the user ID bit on the file "myfile". The command:
chmod g+s myfile
sets the group ID bit on the file "myfile".
The listing below shows a listing of two files that have the group or user ID bit set.

-rws--x--x   1 root    root    14024 Sep  9 1999 chfn

-rwxr-sr-x   1 root   mail    12072 Aug 16 1999 lockfile

The files chfn and lockfile are located in the directory "/usr/bin". The "s" takes the place of the normal location of the execute bit in the file listings above. This special permission mode has no meaning unless the file has execute permission set for either the group or other as well. This means that in the case of the lockfile, if the other users (world execute) bit is not set with permission to execute, then the user ID bit set would be meaningless since only that same group could run the program anyhow. In both files, everyone can execute the binary. The first program, when run is executed as though the program is the root user. The second program is run as though the group "mail" is the user's group.

For system security reasons it is not a good idea to set many program's set user or group ID bits any more than necessary, since this can allow an unauthorized user privileges in sensitive system areas. If the program has a flaw that allows the user to break out of the intended use of the program, then the system can be compromised.

Directory Permissions

There are two special bits in the permissions field of directories. They are:
  • s - Set group ID
  • t - Save text attribute (sticky bit) - The user may delete or modify only those files in the directory that they own or have write permission for.

Save text attribute

The /tmp directory is typically world-writable and looks like this in a listing:

drwxrwxrwt   13 root     root         4096 Apr 15 08:05 tmp

Everyone can read, write, and access the directory. The "t'' indicates that only the user (and root, of course) that created a file in this directory can delete that file.


To set the sticky bit in a directory, do the following:
chmod +t data
This option should be used carefully. A possible alternative to this is
  1. Create a directory in the user's home directory to which he or she can write temporary files.
  2. Set the TMPDIR environment variable using each user's login script.
  3. Programs using the tempnam(3) function will look for the TMPDIR variable and use it, instead of writing to the /tmp directory.

Directory Set Group ID

If the setgid bit on a directory entry is set, files in that directory will have the group ownership as the directory, instead of than the group of the user that created the file.

This attribute is helpful when several users need access to certain files. If the users work in a directory with the setgid attribute set then any files created in the directory by any of the users will have the permission of the group. For example, the administrator can create a group called spcprj and add the users Kathy and Mark to the group spcprj. The directory spcprjdir can be created with the set GID bit set and Kathy and Mark although in different primary groups can work in the directory and have full access to all files in that directory, but still not be able to access files in each other's primary group.

The following command will set the GID bit on a directory:
chmod g+s spcprjdir
The directory listing of the directory "spcprjdir":
drwxrwsr-x 2 kathy spcprj 1674 Sep 17 1999 spcprjdir
The "s'' in place of the execute bit in the group permissions causes all files written to the directory "spcprjdir" to belong to the group "spcprj" .

Umask Settings

The umask command is used to set and determine the default file creation permissions on the system. It is the octal complement of the desired file mode for the specific file type. Default permissions are:
  • 777 - Executable files
  • 666 - Text files
These defaults are set allowing all users to execute an executable file and not to execute a text file. The defaults allow all users can read and write the file.

The permission for the creation of new executable files is calculated by subtracting the umask value from the default permission value for the file type being created. An example for a text file is shown below with a umask value of 022:

   666 Default Permission for text file

    -022 Minus the umask value

      644 Allowed Permissions
Therefore the umask value is an expression of the permissions the user, group and world will not have as a default with regard to reading, writing, or executing the file. The umask value here means the group the file belongs to and users other than the owner will not be able to write to the file. In this case, when a new text file is created it will have a file permission value of 644, which means the owner can read and write the file, but members of the group the file belongs to, and all others can only read the file. A long directory listing of a file with these permissions set is shown below.

-rw-r--r--   1 root     workgrp          14233 Apr  24 10:32 textfile.txt

A example command to set the umask is:
umask 022
The most common umask setting is 022. The /etc/profile script is where the umask command is usually set for all users.

Red Hat Linux has a user and group ID creation scheme where there is a group for each user and only that user belongs to that group. If you use this scheme consistently you only need to use 002 for your umask value with normal users.

Linux Vi Editor commands

VI Commands:


i
insert mode, (ESC to exit insert mode) allows text to be entered on the screen
a
Append to right mode
/word
Move to the occurrence of "word"
n
Locate the next occurance
w
Advance to the next word
e
Advance to the next end of a word
b
Move to the previous word
3b
Move backward 3 words
dd
delete line
3dd
delete 3 lines
D
Delete remainder of a line
dw
Delete word
x
Delete character
o
Open space for new line below the cursor line
O
Open a line above the cursor
CTRL-w
Move back a word in append mode
u
Undo last
U
Undo all changes to current line


In command mode, repeat the last text changing the command on the current line
:w newfilename
save the file to newfilename from the command mode


:wq
save and quit
:q!
quit without saving
r
replace then typa a character ot be replaced with r then return to break up a line
J
join 2 lines
s
substitute (sentence) typed text over a character, ESC when done
cw
change word
c
change part of a line from the cursor to the end of the line
cc
substitute new text for aline, ESC when done
h
move the cursor back one space
H
move the cursor to the highest line on the screen
L
move the cursor to the lowest line on the screen
M
position the cursor at the midpoint on the screen
G
last line in the file
0 (zero)
Move the cursor to the beginning of the line it is on
view filename
Open a file for viewing only
set number
Turn on line numbers
set nonumber
Turn off line numbers

Options:


number

autoindent (ai)
ctrl-d to move to the left
showmatch
match brackets and parenthesis
tabstop=4

wrapmargine(wm)
when line is wrapped (80-value)
:2 copy 4
Place a copy of line 2 after line 4.
:1,4
copy 7 (lines 1-4)
:n
Access the next file for editing

How to take backup/convert production Linux system without downtime P2V, Image to VHD,VMDK & VDI

How to take backup/convert production Linux system P2V without downtime     Today, we are going to learn How to take backup/conv...